Difference between revisions of "Submit a Request"
Gcpc request (talk | contribs) (→Submit a Request) |
|||
| (2 intermediate revisions by the same user not shown) | |||
| Line 1: | Line 1: | ||
| − | Submit | + | Submit an electronic Purchase Request System (ePRS) Request. |
[[File:SubmitRequest.png|550px]] | [[File:SubmitRequest.png|550px]] | ||
| Line 12: | Line 12: | ||
'''4. Mark Category:''' Select the categories which apply to the request. Each category has a cost threshold, if multiple categories are selected, the lowest threshold will take effect. Any request over the threshold will trigger an alert and the request cannot be completed. | '''4. Mark Category:''' Select the categories which apply to the request. Each category has a cost threshold, if multiple categories are selected, the lowest threshold will take effect. Any request over the threshold will trigger an alert and the request cannot be completed. | ||
| − | '''5. Add Vendor Quotes:''' At least one vendor quote is required. Additional supporting files can be attached | + | '''5. Add Vendor Quotes:''' At least one vendor quote is required. Additional supporting files can be attached if needed. |
'''6. Add Item Details:''' Click ‘Add’ to enter requested items. A pop up displays for item entry. -- See ‘Item Details’ Page for more. | '''6. Add Item Details:''' Click ‘Add’ to enter requested items. A pop up displays for item entry. -- See ‘Item Details’ Page for more. | ||
| Line 19: | Line 19: | ||
* ''To Submit'' – Select an action from the action drop down menu. | * ''To Submit'' – Select an action from the action drop down menu. | ||
| − | * ''To Save'' – | + | * ''To Save'' – Return to the Request List, form data will be saved automatically. |
Latest revision as of 23:21, 8 April 2019
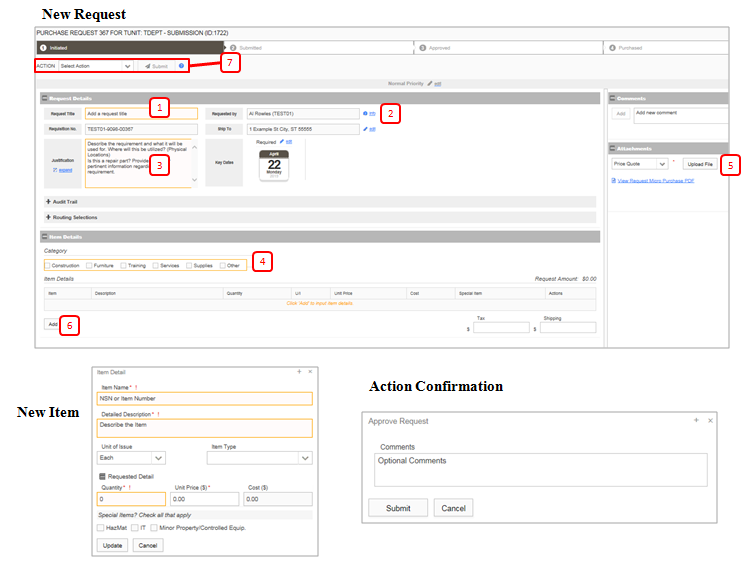
Submit an electronic Purchase Request System (ePRS) Request.
Submit a Request
1. Add Request Title: This will be used for search and reports. The title should summarize the request succinctly.
2. Requestor Information: User Details, Required Date, and Ship Address auto populate based on user data. Required Date and Ship Address are editable.
3. Add Justification: Provide detailed rationale for this request.
4. Mark Category: Select the categories which apply to the request. Each category has a cost threshold, if multiple categories are selected, the lowest threshold will take effect. Any request over the threshold will trigger an alert and the request cannot be completed.
5. Add Vendor Quotes: At least one vendor quote is required. Additional supporting files can be attached if needed.
6. Add Item Details: Click ‘Add’ to enter requested items. A pop up displays for item entry. -- See ‘Item Details’ Page for more.
7. Submit Action:
- To Submit – Select an action from the action drop down menu.
- To Save – Return to the Request List, form data will be saved automatically.
