Difference between revisions of "Site Orientation"
Gcpc request (talk | contribs) |
|||
| Line 8: | Line 8: | ||
3. '''Reports''' – Navigate to reports. | 3. '''Reports''' – Navigate to reports. | ||
| + | |||
| + | After login, users see the LSPS Portal. Depending on user privileges, users will have access to one or more menu items for conducting work, monitoring activity, reviewing completed requests, and/or viewing reports. | ||
| + | |||
| + | == Menus (Navigation) == | ||
| + | '''1.''' '''Request List''' – View work items. A blue number indicates the number of open tasks. Work items are assigned to individual participants or a user group where any individual in the user group can complete the item. | ||
| + | |||
| + | '''2.''' '''New Request''' – Initiate a new request. | ||
| + | |||
| + | '''3.''' '''Reports''' – Navigate to reports. | ||
== Settings == | == Settings == | ||
| − | 4. '''User Options & Settings''' – Click user name to display user options, including menu view changes, settings, and log out options. | + | '''4.''' '''User Options & Settings''' – Click user name to display user options, including menu view changes, settings, and log out options. |
| − | 5. '''Change Menu View''' – Toggle between navigation menu look and feel. Tablet, Mobile, and Desktop views. | + | '''5.''' '''Change Menu View''' – Toggle between navigation menu look and feel. Tablet, Mobile, and Desktop views. |
| − | 6. '''Settings''' – Update user info, including password, email, phone. Update themes or menu layout locations. Update and click ‘Save’ to make changes. | + | '''6.''' '''Settings''' – Update user info, including password, email, phone. Update themes or menu layout locations. Update and click ‘Save’ to make changes. |
| − | [[File:Portal_Orientation.png]] | + | [[File:Portal_Orientation.png|750px]] |
Revision as of 16:42, 21 December 2017
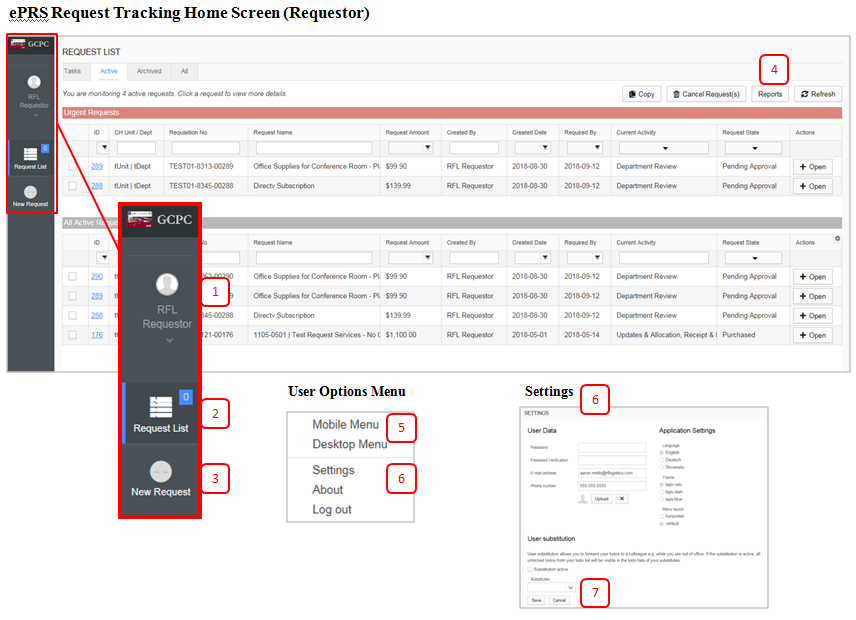
After login, users see the GCPC Activity Area. Depending on user privileges, users will have access to one or more menu items for conducting work, monitoring activity, reviewing completed requests, and/or viewing reports.
1. Request List – View work items. A blue number indicates the number of open tasks. Work items are assigned to individual participants or a user group where any individual in the user group can complete the item.
2. New Request – Initiate a new request.
3. Reports – Navigate to reports.
After login, users see the LSPS Portal. Depending on user privileges, users will have access to one or more menu items for conducting work, monitoring activity, reviewing completed requests, and/or viewing reports.
1. Request List – View work items. A blue number indicates the number of open tasks. Work items are assigned to individual participants or a user group where any individual in the user group can complete the item.
2. New Request – Initiate a new request.
3. Reports – Navigate to reports.
Settings
4. User Options & Settings – Click user name to display user options, including menu view changes, settings, and log out options.
5. Change Menu View – Toggle between navigation menu look and feel. Tablet, Mobile, and Desktop views.
6. Settings – Update user info, including password, email, phone. Update themes or menu layout locations. Update and click ‘Save’ to make changes.
